After you have subscribed to a MailPoet plan, you will receive a license key to activate the MailPoet Sending Service on your site, and the Premium version of the plugin for paid plans.
Quick Links
Requirements to validate your key
- Make sure you have the latest version of MailPoet installed, which is available as a free download here https://wordpress.org/plugins/mailpoet/
- Register a MailPoet account and subscribe to any of our sending plans at https://account.mailpoet.com
How to validate your key
After subscribing to a MailPoet plan, you will receive your activation key via email. You can also grab it from your MailPoet account page at https://account.mailpoet.com/account. On the “My Subscriptions” page, you’ll see the key for your plan and you can copy it by clicking the “Copy” button:

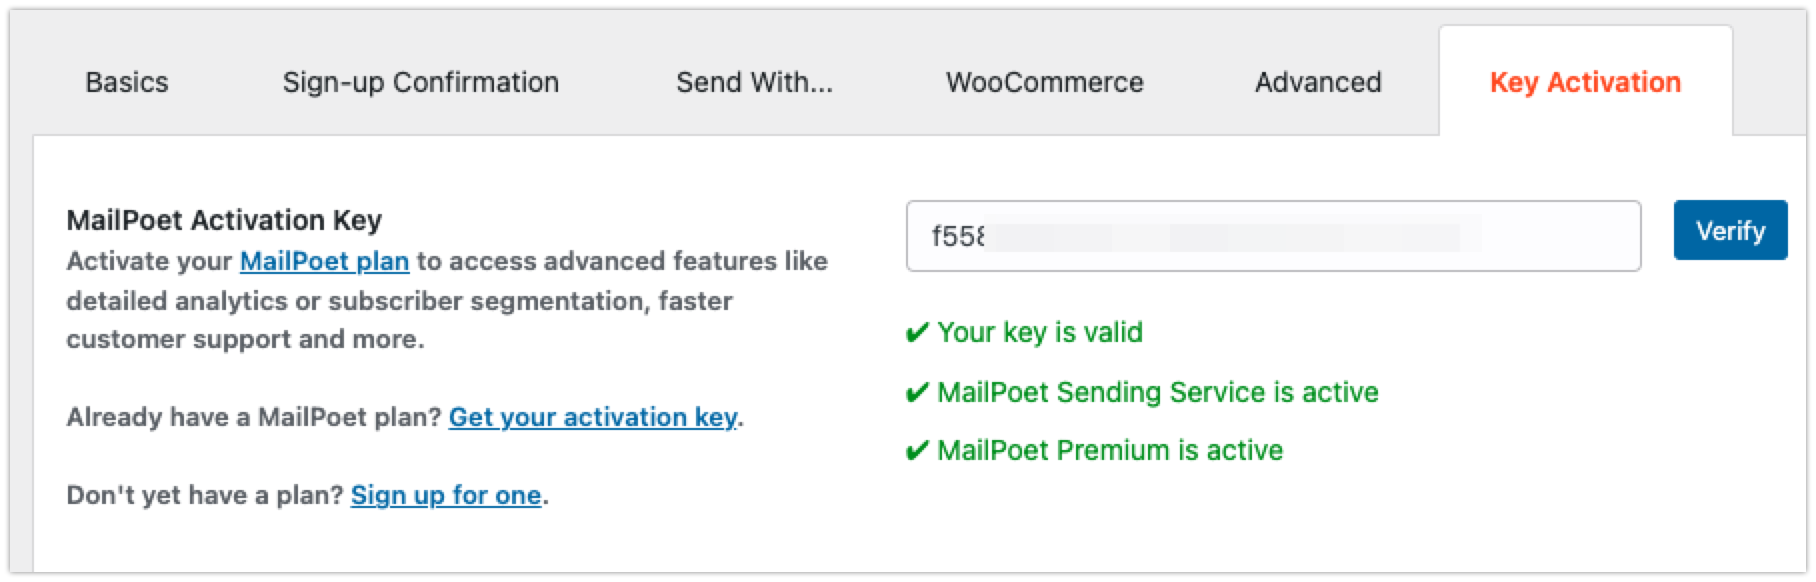
Go to your WordPress dashboard > MailPoet > Settings > Key Activation tab, paste the key in the field, and then click “Verify”:

Key activation will not work if your website is on a localhost environment, behind a firewall or if you’re trying to activate the key for an IP address. Check here other known errors when validating a MailPoet key and how to fix them.
The license key can only be activated on a single site/URL at a time. The regularly scheduled license check task will validate against the full URL where you’ve activated the key to make sure it matches. While you can change the associated domain for a key, if you need to use MailPoet on multiple sites at the same time (including dev/staging and production), you would need multiple plans/license keys.
After your key has been verified, you should see success messages related to what’s included in your plan. For paid plans, you will have a button available to Download and install the Premium plugin on your site.
- For Business plans, both the MailPoet Sending Service and the Premium plugin should be activated;
- For the Starter plan, only the MailPoet Sending Service is activated;
- For the Creator plan, only the Premium plugin is activated.
If you have a paid plan and have the Premium plugin, then you need to keep both MailPoet and MailPoet Premium plugins installed and activated to have access to the Premium features. The MailPoet plugin includes all the core functionality, while the Premium plugin adds the premium features — if you have only the Premium plugin installed, MailPoet won’t work.
You will also need to keep both plugins updated to the same version. In the X.Y.Z version number, at least the X and Y will need to match (though the Z may sometimes differ if there is a smaller update released).
Installing the MailPoet plugin for the first time
If you’re installing the MailPoet plugin for the first time, you won’t see the admin pages (Settings, Newsletters, Forms, Subscribers, Automations, etc) in the menu until you complete the onboarding steps. To get started, click on the “Begin setup” button:

The first step asks you to enter a Name and an Email address to set the Default sender of your emails. These can be changed later by going to the MailPoet > Settings > Basics tab.
Please make sure to enter a valid email address with an active mailbox.

In the second step, you’ll go through the privacy and data settings, deciding whether you want to enable Google Fonts and other 3rd-party libraries we use, and if you’re fine with sharing non-sensitive data about how you use MailPoet with us. These can also be changed in the plugin’s Advanced settings tab after completing onboarding.

The third step will only display if you have the WooCommerce plugin installed on the site. You can choose if you want to import all previous WooCommerce customers as subscribed or not, and if you want to enable tracking cookies for e-commerce metrics purposes. Note that you should only import your WooCommerce customers as “Subscribed” if you have clear consent from them (i.e. they opted in to joining your list and receiving marketing/newsletter emails from you).

In the fourth step, click the “Connect MailPoet” button to subscribe to one of our plans, or to prompt the input to enter your existing API key.
Important! The input to enter the API key is only present on this page after you click the “Connect MailPoet” button. If you already have a MailPoet plan, simply close the new tab that opens and continue on the onboarding setup screen to see the input for the API key. If you close the setup tab at this stage, you’ll need to go through the setup steps all over again once you’re back to your website.
If you’re not planning on using any of our plans, that’s fine. Click the “I’ll set up my own email service” link at the end of this page to skip the step. You could also do this if you have an existing MailPoet plan and want to enter your key in the settings later on (under MailPoet > Settings > Key Activation).


Installing the MailPoet Premium plugin
Please note the Premium plugin is only available for paid subscriptions. This is not included in the Starter – 1,000 plan.
When verifying your API key under MailPoet > Settings > Key Activation, it will display a button to Download the Premium plugin if it’s not already installed, and then an option to automatically install and activate it.
Alternatively, you can manually download the .zip file for the Premium plugin from your MailPoet account as described here. Then, go to your WordPress dashboard > Plugins > Add New and click on the “Upload Plugin” button:

Upload the .zip file for the MailPoet Premium plugin (make sure it is a .zip file, and not a folder/directory, in case your browser or OS auto-unzipped the file):

Getting the Premium plugin from your MailPoet account
If you can’t download the Premium plugin from the WordPress dashboard > MailPoet > Settings > Key Activation tab for some reason, you’ll be able to get the .zip file for the Premium plugin on your MailPoet account account.mailpoet.com/account

Then follow the steps to manually upload it on the WordPress dashboard > Plugins page.
If you need an older version of the Premium plugin (for example to roll back to the previous version), you can also use the same URL from your account page and change the `latest` to the version you want, such as `4.43.0`
The end of the URL would be in the format: `mailpoet-premium/[YOUR-LICENSE-KEY]/[VERSION]/mailpoet-premium.zip`, where [YOUR-LICENSE-KEY] is your paid and active license key, and [VERSION] is the version number.
That said, please note that we only support the latest version and two most recent minor versions.
If you need further help, get in touch with us.