What’s the difference between a subscription form and a contact form?
A subscription form is used to collect email addresses from users interested in receiving updates or marketing content. Through this form, subscribers will be added to the MailPoet list of your choice and you’ll be able to send them newsletters.
A contact form is used for general communication between users and website owners/support teams. If you’re looking at a contact form, we recommend checking out the integration options with third-party plugins listed here: MailPoet Plugins
Quick links:
The Form Editor
Block
The MailPoet Form Editor uses the WordPress Block Editor (Gutenberg). To create a form, you should go to MailPoet > Forms > + New Form. You can choose from one of our pre-designed templates for the different types of forms or create yours from scratch.


The Form Editor

Settings
From the form settings located on the right sidebar you can:
- Select the list your subscribers will be added to when subscribing through this form;
- Choose if they’re going to see a message after subscribing or be redirected to a new page.

If you don’t want to pre-select these lists and would rather allow your subscribers to select which lists they want to join, add a block called List Selection. To do this, click on the ” +” icon to open the popup with the options and search for List Selection.

Styles

In the Styles tab, you can customize how your form will look like by changing the settings for:
- Background Color
- Background Image
- Font Color
- Font Size
- Font Family
- Input Padding
- Border Size
- Border Radius
- Border Color
- Alignment
- Form Padding
- Success Message Color
- Error Message Color
- Close Button Style
Note that if you add an image background to your form. It will not display on mobile to provide a better user experience and performance.
If you want to continue using the image as a background, you can try using CSS code to force the image to be shown. Alternatively, try adding it as an image block and it should work.
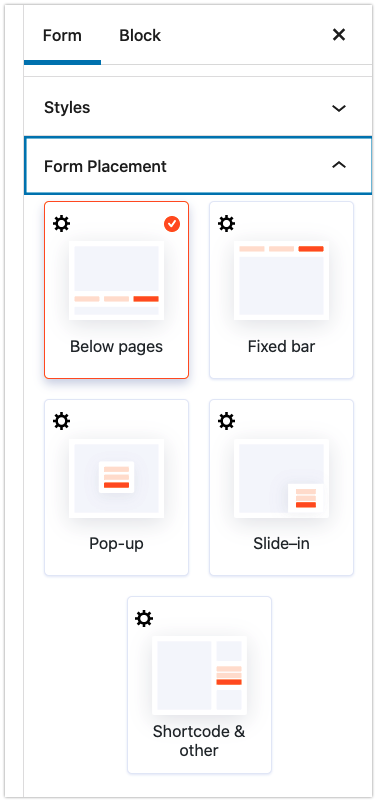
Form Placement
You can choose to display the form:

When selecting the Form Placement setting, you can choose from a few display options.
If you select Below pages, Fixed Bar, Pop-up, or Slider-in, you can set where the form will be displayed: on all pages and/or all pages and products, or only on specific pages and/or posts from a specific category/tag.
For specific instructions on how to set up Pop-up and Slide-in forms, please check out this article.
If your form doesn’t show up, please go through these steps.
For the “Shortcode & other” option, you can choose to:
- Copy the shortcode for the form to add it to your pages and/or posts;
- Add the form as a widget;
- Get the PHP code to integrate the with your theme or the iFrame version if you want to use it on an external website.
While there are no built-in options to embed forms in emails that you send out, or to share the form directly on social media, once you have added the form to a page on your site then you can share the URL for that page in any email or social media platform.
Aside from the options described above, you can also add a form you’ve created as a Gutenberg block exactly where you want it in the WordPress page editor.
Tags
You can set a Subscriber tag or tags that you want to assign to any Subscribers who sign up via this form:

Custom CSS
You can style your form components with Cascading Style Sheets (CSS.) When saving your form, all the styles added in this panel will also be saved – there is no need to add these styles to your own theme’s stylesheet.

does not provide support for styling subscription forms. If you need help styling a form and would like to hire a developer, we recommend reaching out to one from
Codeable (affiliate link).
Block
Adding a block
Just click on the ” +” icon to open the popup with the options to search for a block and manage default and custom fields.

When expanding a panel ( i.e. Fields), you’ll see all the block options for it.

If you’ve already created a form using the new editor, you’ll see also a panel for the Most used blocks.
By clicking on an option, it will be automatically added to your form editor as a new block.
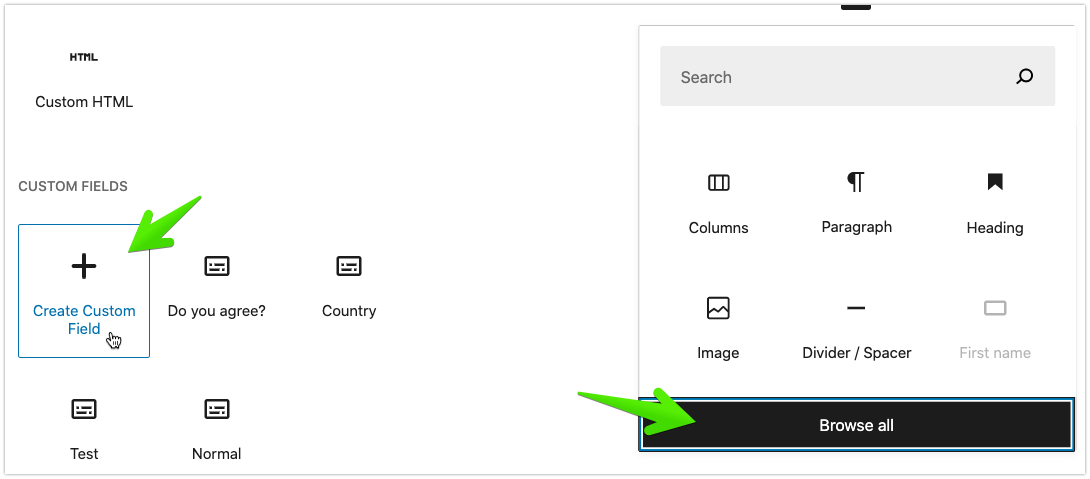
To see ALL the fields (including custom fields created), you should click on the “Browse all” button and a sidebar will be displayed with all the fields available to be added to your form:

Creating a custom field
To create a custom field, you should click on the “+” icon to add a block > Browse all > scroll down to the “Custom fields” section and click on the “Create custom field” option:

Please note that all custom fields will be visible to your subscribers on the Manage Subscription page.
If you’re using a 3rd-party form plugin, make sure you don’t have any custom field created with the MailPoet form editor set up as “mandatory” that is not included in your 3rd-party form. Otherwise, the subscription process and integration may not work as expected. In this case, you should be able to remove the custom field from the plugin by following these steps.
Editing a block
When selecting a block, you can edit its settings in the Block tab on your form editor’s sidebar.

There you have the option to customize the field’s Settings, Styles, and add custom CSS via the Advanced tab.
You can move your blocks up and down by using the arrow buttons.

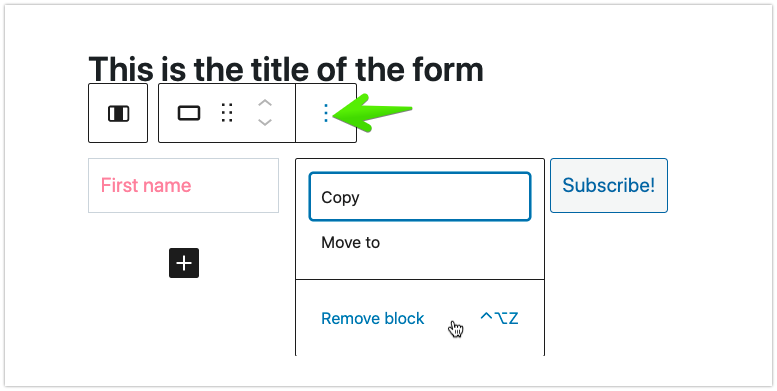
Removing a block
To remove it from the form, simply select the block and click on the 3 dots icon.

Removing a custom field
To completely delete a custom field from all forms, you have to first add it to form and then click on the ” Delete this custom field” link in the Custom field settings.