When creating your subscription form with the MailPoet form editor, we offer several types of forms that you can use to capture subscribers and grow your email list. You can choose which type of form you’re creating in the Form Editor > Form Placement panel.

Except for the “shortcode & other”, all form types allow you to select them to be displayed on all pages, on all product/posts pages, only on specific pages and/or products, or only on posts from specific categories and/or tags.
Here’s a brief overview of each form type and when you should use them:
Below pages
This is a form that is displayed at the end of your blog posts or other content, encouraging visitors to subscribe after reading.

Pros:
- Encourages visitors to subscribe after they’ve read the website’s content.
Cons:
- May not be seen by visitors who don’t read the entire content.
Fixed bar
This form stays fixed at the top or bottom of your website, encouraging visitors to subscribe as they scroll.
Pros:
- Always visible on the website, without interrupting user experience. This type of form is particularly useful for websites with longer pages or that require a lot of scrolling.
- Encourages subscription in a subtle way.
- Can be triggered after a set amount of time
Cons:
- May not be as attention-grabbing as other form types.
- May not be suitable for all types of websites.
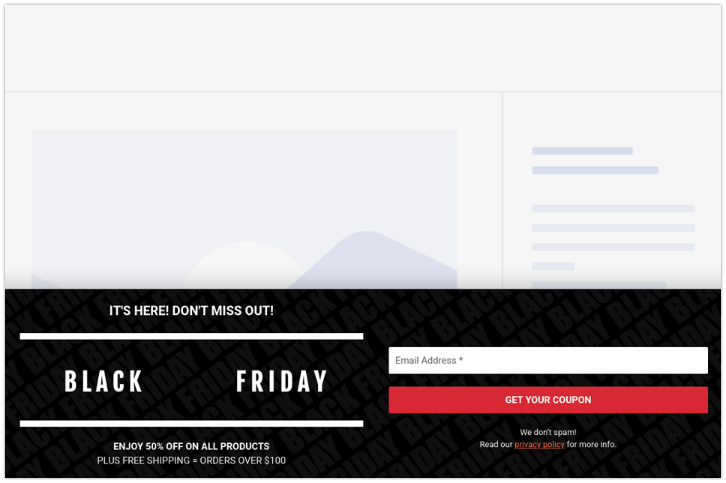
Pop-up
This is a form that pops up on your website after a set amount of time, or when a visitor takes a certain action, such as scrolling to a specific part of the page.

Pros:
- Grabs visitors’ attention and encourages them to subscribe.
- Can be triggered after a set amount of time or when a visitor takes a specific action (Exit-intent display).
Cons:
- May interrupt the user experience and be seen as intrusive.
- May be blocked by browser extensions or ad blockers.
Slide-in
This is a form that slides in from the side or bottom of your website, catching visitors’ attention without interrupting their browsing experience.

Pros:
- Grabs visitors’ attention without interrupting their browsing experience.
- Can be triggered after a set amount of time.
- Choose if you want it to be displayed on the left or right bottom corner of the website.
Cons:
- May not be suitable for all types of websites.
Shortcode and other
Shortcodes for your forms are convenient snippets of code wrapped within square brackets; for example, [mailpoet_form id=”11″]. These snippets allow you to effortlessly incorporate your form into your site without delving into complex coding. Designed for simplicity and efficiency, shortcodes let you embed your form into posts, pages, or widgets with just a brief line of text. The beauty of a shortcode lies in its simplicity, allowing you to place subscription forms exactly where they’re most effective.

How to Find Your Form’s Shortcode
Finding the shortcode for your MailPoet form is straightforward. Once you’ve created and customized your form within MailPoet, follow these steps to locate its unique shortcode:
- Navigate to the Form Editor > Form Placement panel within your MailPoet dashboard.
- Look for the Shortcode and other option. This section is specifically designed for instances where you need a flexible way to embed your form outside the preset placements.
- Here, you will find the shortcode designated for your specific form. This code can be easily copied and pasted into the desired location on your website, whether it be a page, post, or widget area.
By inserting the form’s shortcode where it aligns with your website’s design and user flow, you enhance the visibility of your subscription form, encouraging more visitors to subscribe.
Widget
This form can be added to your website’s sidebar or footer in the
WordPress admin > Appearance > Widgets, making it easily accessible to visitors from any page.

iFrame
The iFrame version of a MailPoet form allows you to embed your subscription form into external websites, that is, a website other than the one with MailPoet installed, such as a secondary site. By using an iFrame, you’re essentially creating an inline window on your secondary site that displays the subscription form hosted on your primary site.
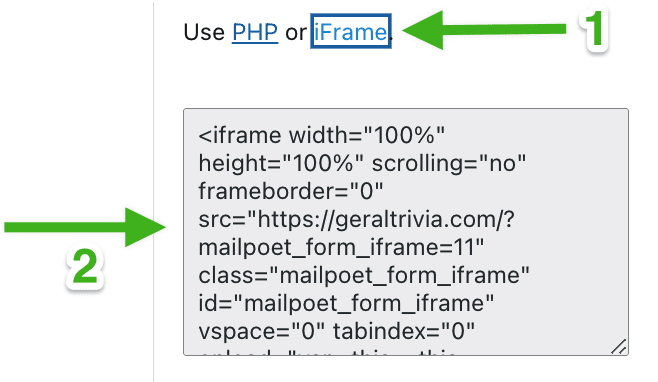
Here’s a concise guide on how to utilize the iFrame version of your form:
- Locate the subscription form you wish to use and navigate to the Form Placement > Shortcode and other option.
- Generate the iFrame code for it (see label 1 above). This code is a string of HTML that creates the inline frame (see label 2 above).
- Copy this iFrame code, ensuring it includes the complete script provided by MailPoet.
- Paste the iFrame code into the HTML of the pages or posts on your secondary website, where you want the form to appear.
By embedding the iFrame code, visitors to your secondary site can use the same MailPoet form to sign up, effectively consolidating your subscribers from both sites into one unified list. The form will retain the same design and functionality as it has on your primary site, providing a consistent user experience across your web presence.

By experimenting with different form types and tracking their performance, website owners can determine which types work best for their specific goals and audience. Check out our blog post on Ways to Make Your Newsletter Signup Form Work Harder.