MailPoet Automations let you send targeted emails and run other actions automatically when a specific event occurs, such as a new subscriber signing up or a customer placing an order. This article explains what the Automation feature is, how to set up an automation from scratch or from a template, how to manage active automations, and how to review their statistics.
Quick Links
- What Is the Automation Feature?
- How to Set Up an Automation
- Transactional Email vs Marketing Email
- How to Check Statistics for Each Email Within an Automation
- Editing an Active Automation
- Deactivating an Automation
- How to Filter Automation Analytics by Version
- Creating an Automation from a Template
- Duplicating an Automation
- Managing Automations in Bulk
- Canceling or Resuming an Automation Run for a Subscriber
What Is the Automation Feature?
MailPoet Automations help you engage with your subscribers and customers at the right time and in the relevant context. Personalized, time- and context-relevant marketing can help you reach higher engagement and conversion rates.
You can use Automations to build drip campaigns, tag subscribers, add them to lists, and more. Using combinations of triggers, actions, and branching If/Else conditions, you can set up a series of steps in a single workflow or across multiple workflows.
You can also use Automations to send transactional emails based on WooCommerce order status changes. These emails are sent whether or not the subscriber has the Subscribed status.
Note: Most Automations features are only available to users on a paid plan who have MailPoet Premium installed and activated. Users on the free Starter plan (or no plan) cannot create custom automations. Only a limited setup with basic templates is available, and the options to add or remove steps are disabled.
Note: If you have legacy WooCommerce Emails, Welcome Emails, and Drip Campaigns, they are listed under MailPoet > Automations.
How to Set Up an Automation
You can create an automation from scratch or start from a template. This section covers creating one from scratch, step by step.
Creating an Automation from Scratch
To create an automation from scratch, follow these steps.
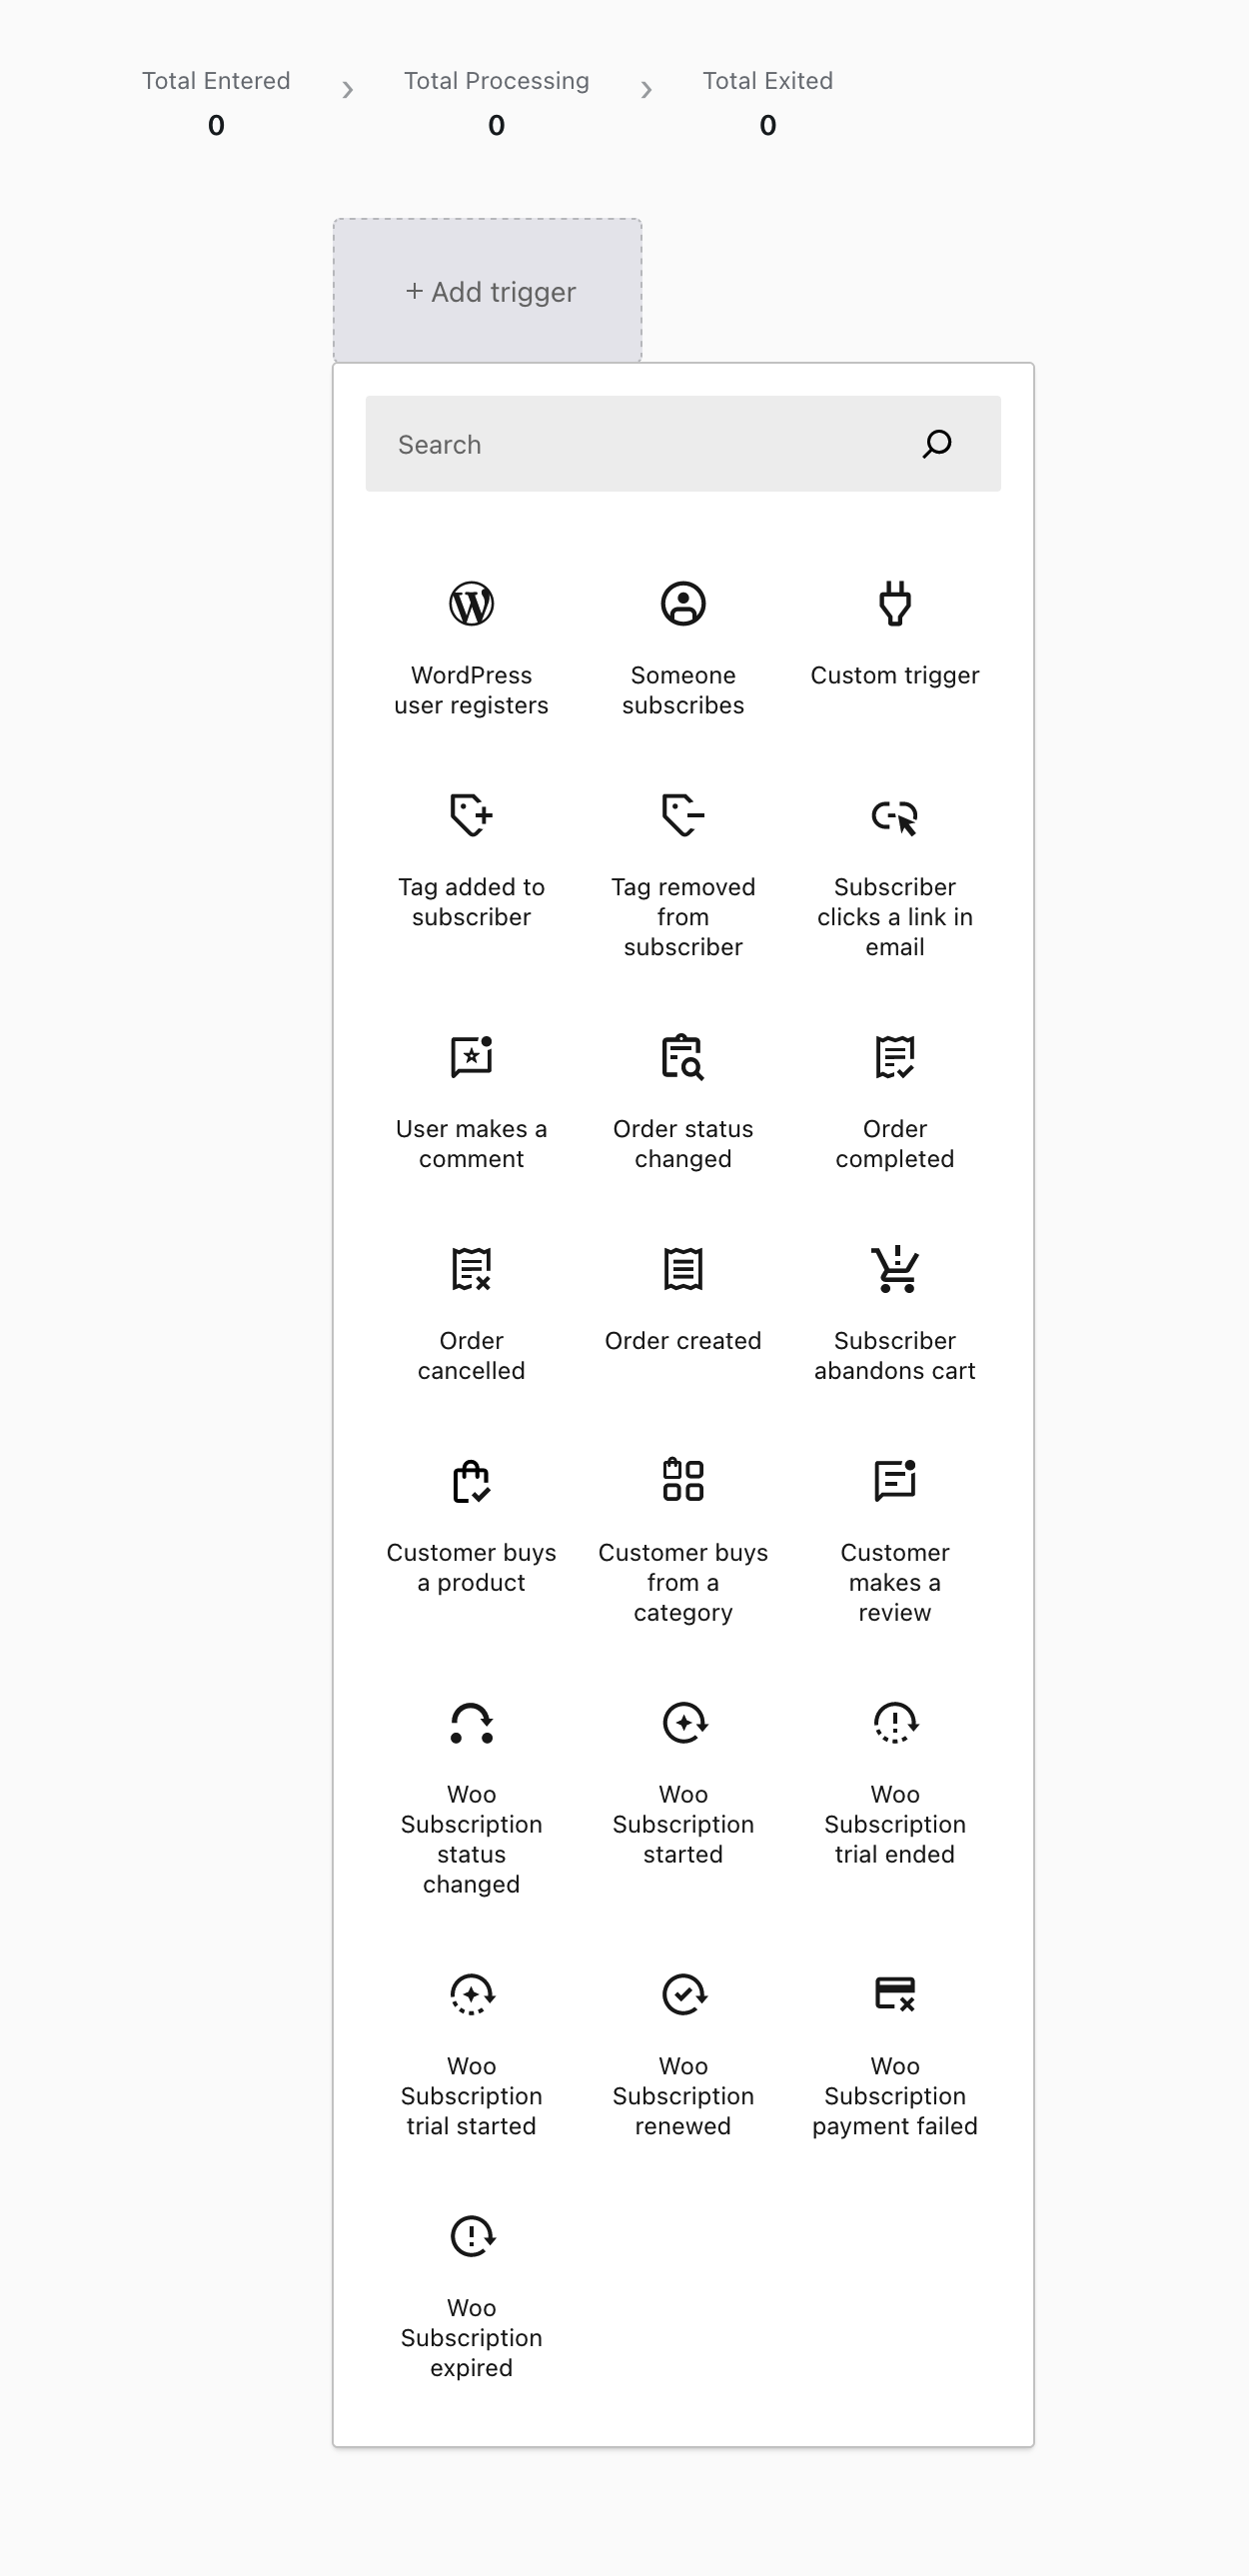
1. Choose a Trigger
The first step is to select a trigger to begin the automation. When that trigger event occurs, the automation runs.
You can choose from several trigger options. There are triggers based on events related to WordPress core functionality, WooCommerce orders, customer behaviors, MailPoet subscribers, WooCommerce Subscriptions, and WooCommerce Bookings. You can review the full list of available triggers.
The screenshot below shows an overview of the available triggers.
Each step added to the automation can be selected and configured in the sidebar settings, under the Step tab, where you can find options to customize your trigger.

Each trigger has different customization options based on its context. You can review the options available for each trigger on the Automation Triggers page.
Every trigger also comes with a filtering option that lets you further customize who is targeted by this automation. To see the filtering options, click the +Add Trigger Filter button in the trigger settings.
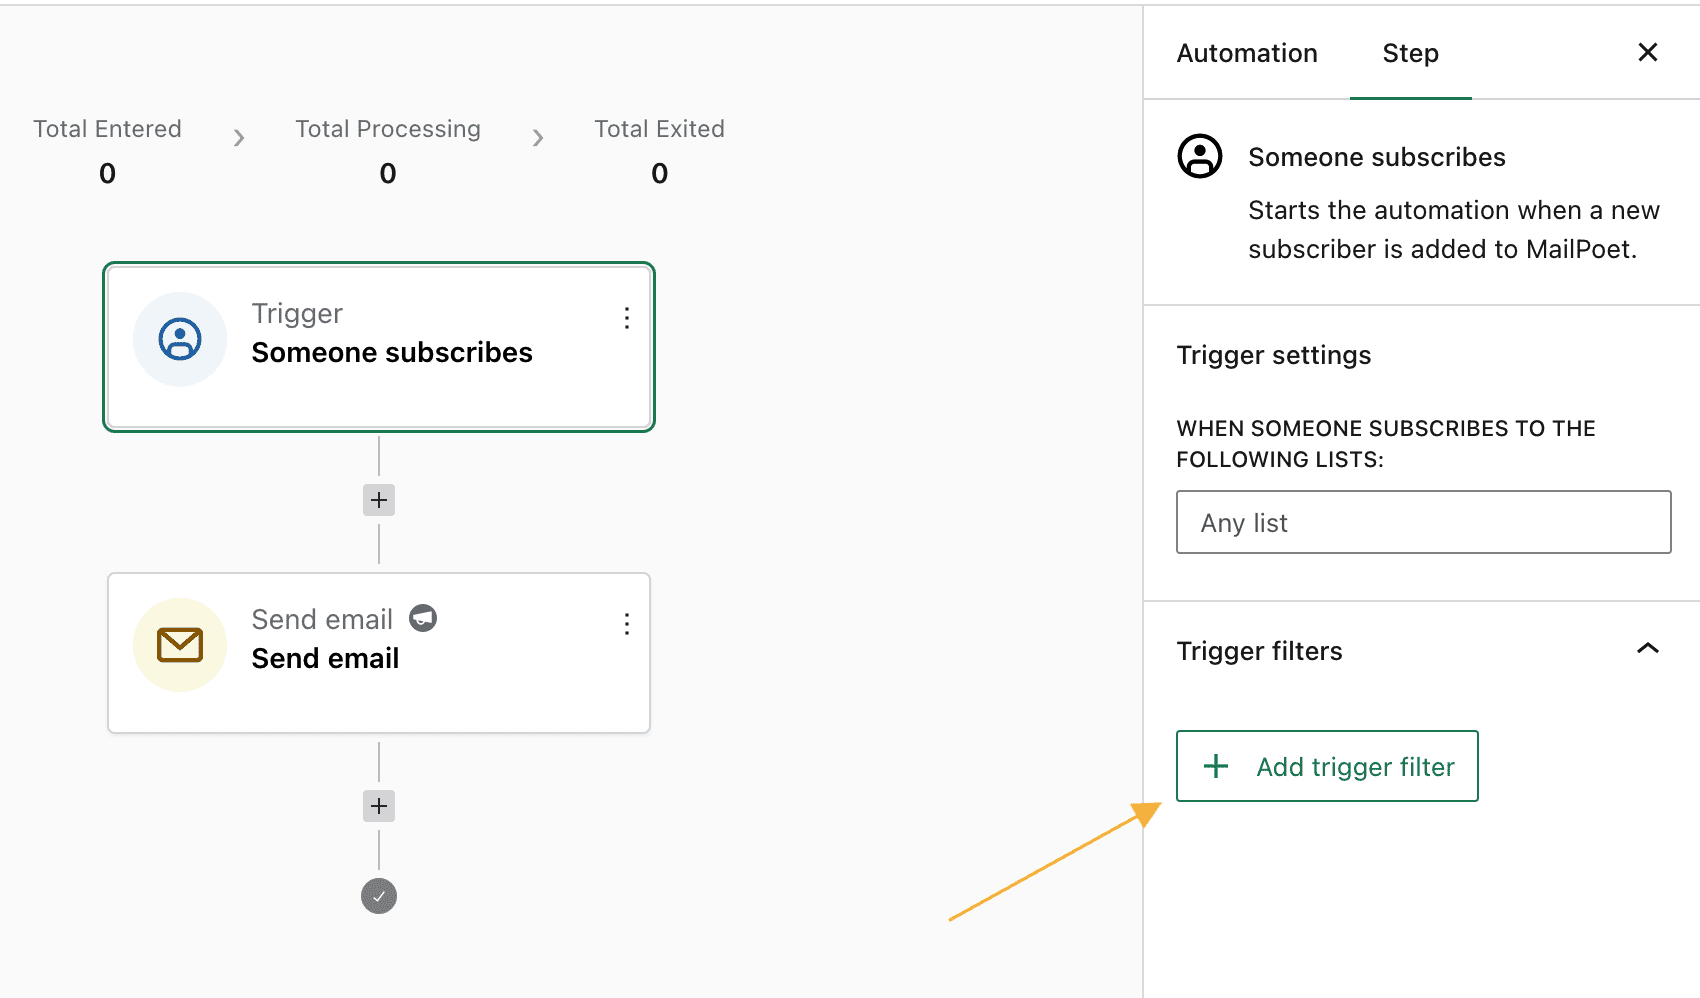
Clicking the +Add Trigger Filter button opens a range of options you can choose from, such as details and behaviors of your MailPoet subscribers, WooCommerce customers, and WordPress users. The following lists show the full set of criteria available for each group.
MailPoet Subscribers
- Automation – entered
- Automation – exited
- Automation – processing
- Email address
- Email – clicked count
- Email – machine opened count
- Email – opened count
- Email – sent count
- Engagement score
- First name
- Is globally subscribed
- Last engaged
- Last name
- Segments
- Status
- Subscribed date
- Subscribed lists
- Subscription source
- Tags
WooCommerce Customers
- Average spent
- Billing city
- Billing company
- Billing country
- Billing phone
- Billing postcode
- Billing state/country
- First paid order
- Last paid order
- Last review date
- Order count
- Purchased categories
- Purchased tags
- Review count
- Shipping city
- Shipping company
- Shipping country
- Shipping phone
- Shipping postcode
- Shipping state/country
- Total spent
WordPress Users
- Is guest
- Registered date
- Roles
2. Choose What Happens Next
Next, choose what action or actions take place after the trigger. This can be a single action or a series of actions, such as adding a delay, sending an email, or adding or removing a tag from a subscriber. If there is no delay, each action in the automation runs immediately after the previous one completes.
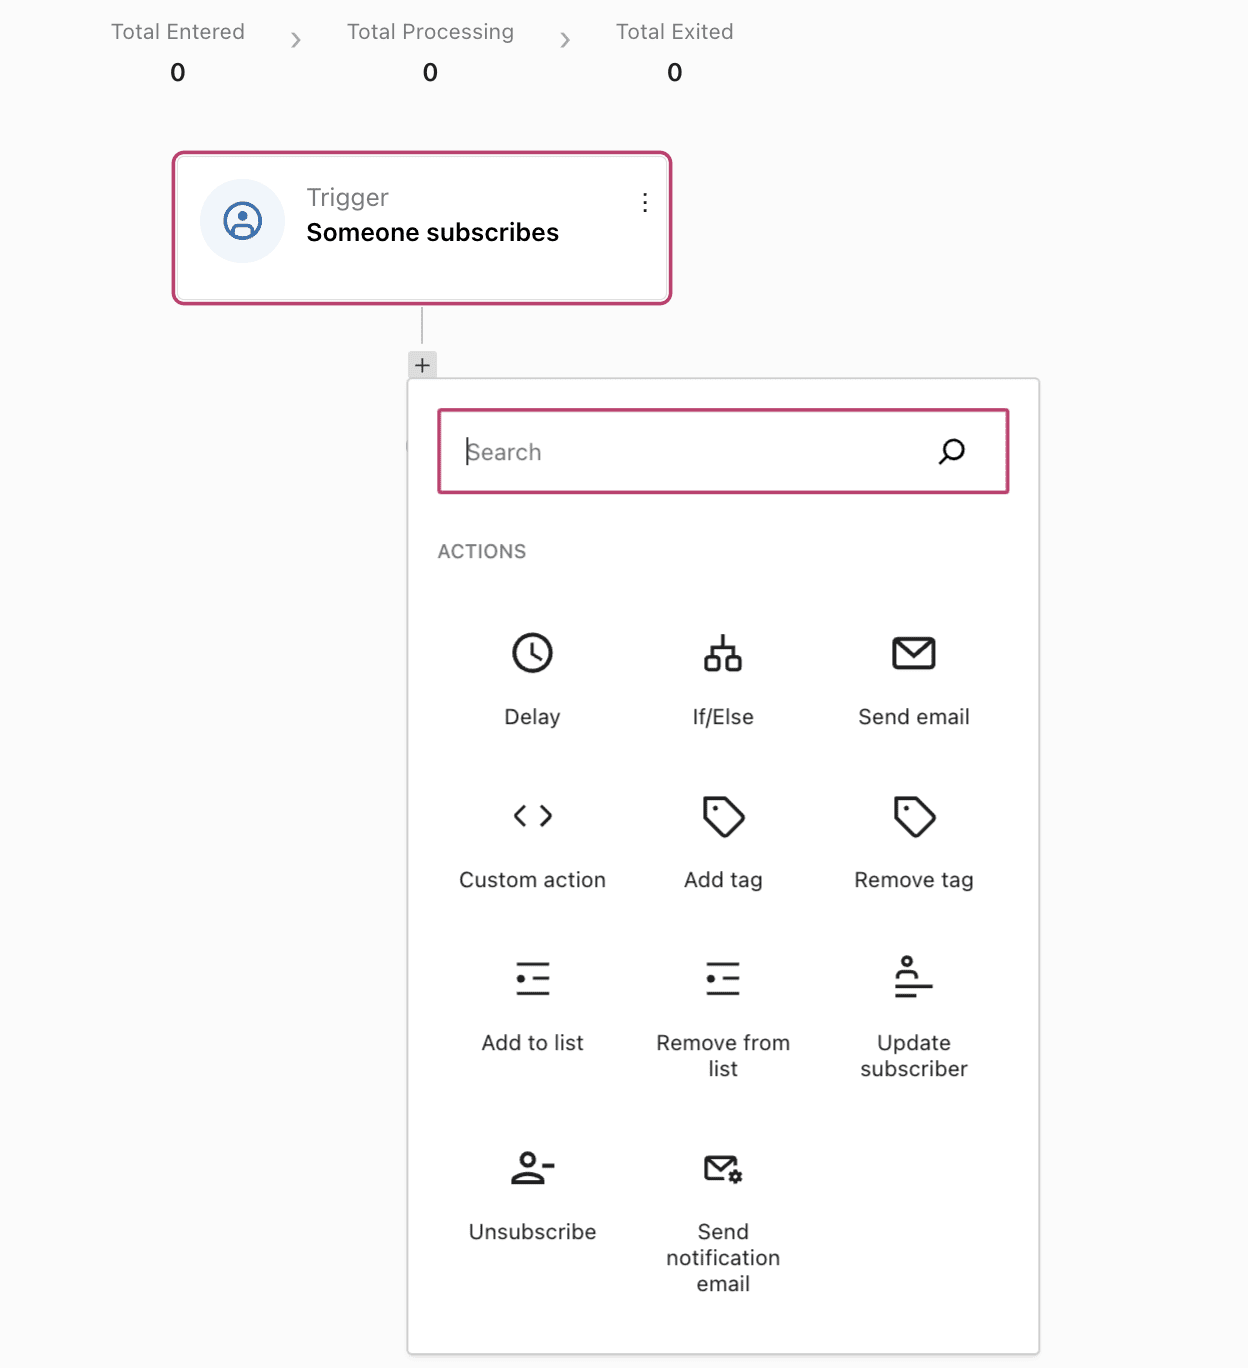
You can review the full list of currently available actions.

You can choose one or more actions for each automation, which means you can create a drip campaign that sends a series of emails, for example.

3. Design Your Emails
If you have added any Send email actions to your automation, you need to create an email to send (or select a previously created one) by clicking the + Design email button.

This redirects you to the Templates page, where you select a template to move to the email editor. MailPoet provides a growing library of pre-built email patterns for common automation use cases such as welcome emails, abandoned carts, post-purchase follow-ups, and win-back campaigns. You can use these patterns as a starting point and customize them to match your brand.
Once you finish editing your email, click the Save and continue button in the top-right menu on this page.

Make sure you have set an appropriate Subject for the email in the sidebar of the automation editor after selecting the Send Email step.
You can return to edit the content of the email later by going back to the Automations page, selecting the Send email step, and using the Design email button again.
4. Activate It
To name your automation, click the New automation text in the header of the automation editor and enter a descriptive name.
Once you have added all the steps to your automation and everything is set up, you are ready to activate it by clicking the Activate button.

You can also leave it inactive to finish editing later. Inactive automations appear on the main Automations page and can be edited at any time before activating.
Transactional Email vs Marketing Email
Two things determine whether an email sent through an automation is considered a transactional email (which does not require the subscriber’s opt-in) or a marketing email (which does require the subscriber’s opt-in): the type of trigger you use, and whether there is a Delay action between the trigger and the Send Email action.
Types of Triggers
An email sent through an automation is considered transactional when using the following types of triggers, as long as they are not followed by a Delay action:
- Order-related triggers
- WooCommerce Subscriptions-related triggers
- User Abandons Cart triggers
You can see the full list of triggers.
Delay Action
The Delay action lets you set a timeframe between a trigger and an action, or between two actions.
If there is no Delay action between one of the triggers listed above and the Send Email action, MailPoet treats the email as transactional (for example, the email contains important information related to the order or subscription). That means the automation runs for all users, whether or not they are subscribed to your list.
Important: Other non-delay actions such as Add Tag, If/Else, or Add to List placed between the trigger and the Send Email action do not change the email type. The email remains transactional as long as no Delay action is present before it. Only the Delay action converts an email from transactional to marketing.
On the other hand, if there is a Delay action before the Send Email action, MailPoet treats the email as a marketing email. This means the automation runs only for subscribers who have opted in to your newsletters and have the Subscribed status.
The example below shows an automation with two Send Email actions: the first is a transactional email, and the second is a marketing email, because there is a Delay action before it. The icon next to the automation name indicates the type of email.

How to Check Statistics for Each Email Within an Automation
To see the statistics for an email in an automation, click the three dots next to the email.

You can also see how many subscribers have been processed by a specific automation on the main Automations page. The following metrics are shown:

- Entered — how many subscribers started the automation.
- Processing — how many subscribers are in process and have not finished the automation yet.
- Exited — how many subscribers completed the automation.
In some cases, when checking the automation statistics, you might see a Failed status for an action (for example, Send email or Add tag). A few reasons can cause an action to fail, such as:
- The subscriber does not have a Subscribed status, but the action requires the subscriber’s consent or opt-in.
- The action targets subscribers from a specific list, but the subscriber that entered the automation is not subscribed to that specific list.
- The automation could not create the sending task for some reason.
- The subscriber has Bounced status.
Editing an Active Automation
You can edit an active automation at any time, even if subscribers are currently mid-flow. When you save your changes, MailPoet creates a new version of the automation. Subscribers who already entered the automation continue through the version they started on, while new subscribers use the updated version.
When No Subscribers Are Mid-flow
If no subscribers are currently in progress in the automation, clicking the Update button saves your changes immediately. No additional prompts are shown.
When Subscribers Are Mid-flow
If subscribers are currently in progress, clicking Update opens a dialog asking how this update should affect them. You have two options:
Let in-flight subscribers finish (selected by default) — Subscribers who are already mid-flow continue on the previous version of the automation and finish their run as planned. New subscribers who enter the automation after you save go through the updated version.
Drop in-flight subscribers — All in-flight runs are cancelled immediately. Only new subscribers who enter the automation after you save go through the updated version. Use this option with caution, as cancelled runs cannot be resumed.
After making your choice, click Save to apply the changes, or Cancel to go back to the editor without saving.
What You Cannot Change
The automation’s trigger cannot be swapped for a different trigger type once the automation has been saved. For example, you cannot change a “Someone subscribes” trigger to an “Order completed” trigger. You can, however, edit the trigger’s settings and filters at any time.
If you need a completely different trigger, create a new automation instead.
Tip: Because each save creates a new version, you can compare the performance of different versions using the version filter in automation analytics. See the How to Filter Automation Analytics by Version section below for details.
Deactivating an Automation
To deactivate an active automation, open it in the editor and click the Deactivate button.
If no subscribers are currently mid-flow, the automation is deactivated immediately and its status changes to Inactive.
If subscribers are currently mid-flow, you are prompted with a dialog offering two options:
1. Let Entered Subscribers Finish the Flow
New subscribers do not enter the automation, but subscribers who are already mid-flow can finish their run. While these subscribers are still progressing through the automation, the automation’s status changes to Deactivating. Once every subscriber has completed or exited the flow, the status changes to Inactive.
2. Stop Automation for All Subscribers
The automation stops immediately for all subscribers, including those who are currently mid-flow. Their runs are cancelled and will not continue even if you reactivate the automation later. Use this option with caution.
Reactivating a Deactivating Automation
If an automation is in Deactivating status (waiting for in-flight subscribers to finish), you can reactivate it without waiting. Open the automation in the editor and click Update and Activate. The automation returns to Active status, in-flight subscribers continue their run, and new subscribers can enter the automation again.
If the automation is fully deactivated (Inactive), you can reactivate it by opening it in the editor and clicking Activate.
How to Filter Automation Analytics by Version
When you edit and save an active automation, MailPoet creates a new version. Because each subscriber’s run is tied to the version they started on, the analytics page lets you view performance data for a specific version or across all versions combined. This keeps your reporting accurate even when you make changes mid-campaign.
Accessing the Version Filter
To access the version filter, follow these steps.
- Go to MailPoet > Automations.
- Click the Analytics link next to the automation you want to review.
- Look for the Version dropdown in the header area, next to the date range filter.

Note: The version dropdown only appears when an automation has two or more saved versions. If you have never edited and saved the automation after its initial activation, you do not see this dropdown.
Filtering by a Specific Version
Select a version from the dropdown to view analytics for only that version. Each version is labeled with the date and time it was saved:
- Current version (saved [date]) — the latest saved version, which all new subscribers go through.
- Version saved [date] — an older version that may still have in-flight subscribers completing their flow.
When you select a specific version, all sections of the analytics page update to reflect only the subscribers who ran (or are running) through that version. This includes the overview metrics, the automation flow diagram, the subscribers list, and the orders table.

Viewing Aggregate Data Across All Versions
Select All versions from the dropdown to see combined analytics across every version of the automation. This gives you a complete picture of the automation’s overall performance since it was first activated.
How Versioning Works
Here is a quick summary of how automation versioning works:
- New version on save: Every time you save changes to an active automation, a new version is created.
- In-flight subscribers are not affected: Subscribers who entered the automation before your edit continue through the version they started on.
- New subscribers use the latest version: Any subscriber who enters the automation after the save goes through the updated version.
- Analytics stay clean: Because each run is tied to a specific version, you can compare performance between your original and updated automations.
Tip: You can use version filtering to compare results before and after a change, similar to A/B testing. For example, update a subject line or delay timing in your automation, then compare the analytics of the current version against the previous one to measure the impact.
Creating an Automation from a Template
Instead of building from scratch, you can choose one of the templates for your automation on the main Automations page.

Templates are available for a variety of use cases, including welcome emails, abandoned carts, post-purchase follow-ups, product reviews, WooCommerce Subscriptions, and WooCommerce Bookings. The list of available templates continues to grow with each update.
You need to customize each step of the automation and then activate it.
Duplicating an Automation
You can duplicate any automation from the main MailPoet > Automations page. This creates a full copy of the automation, including all steps, settings, and email content from any Send Email steps.
To duplicate an automation:
- Go to MailPoet > Automations.
- Find the automation you want to duplicate.
- Click the three-dot menu next to the automation and select Duplicate.
The duplicate is named “Copy of [original name]” and is created as inactive. You can edit it and activate it when ready.

Note: Duplicating is not available for legacy automations (Welcome Emails, WooCommerce Emails, and Drip Campaigns created before MailPoet Automations) or automations in the Trash.
Managing Automations in Bulk
Starting with MailPoet 5.25.0, you can perform actions on multiple automations at once from the MailPoet > Automations page.
To use bulk actions:
- Go to MailPoet > Automations.
- Select the checkboxes next to the automations you want to manage.
- Choose an action from the bulk actions toolbar that appears.
The available bulk actions depend on the status of the selected automations:
| Bulk action | Available for |
|---|---|
| Duplicate | Active and inactive automations (not legacy or trashed) |
| Trash | Active and inactive automations |
| Restore | Trashed automations only |
| Delete permanently | Trashed automations only |
For destructive actions like Trash and Delete permanently, a confirmation dialog appears before the action is carried out. Permanently deleting an automation removes it and all associated data and cannot be undone.
Canceling or Resuming an Automation Run for a Subscriber
You can cancel an in-progress automation run for a specific subscriber, or resume a previously canceled run. This gives you manual control over individual automation runs without affecting other subscribers in the same automation.
Canceling a Run
To stop an automation for a specific subscriber:
- Go to MailPoet > Automations and select the automation.
- Open the Analytics tab.
- Click the Subscribers tab to see the list of subscribers in the automation.
- Find the subscriber whose run you want to cancel. Next to the View activity button, click the three-dot menu (⋮).
- Select Cancel run.
- A confirmation dialog appears asking: “Are you sure you want to cancel this run for this subscriber?” Click Yes, cancel run to confirm.

The automation stops for that subscriber, and any remaining steps are not executed. A success notification confirms the run was canceled.
Note: The Cancel run option only appears for subscribers whose run has a “running” status. Runs that have already completed or failed do not show this option.
Resuming a Canceled Run
If you canceled a run by mistake, or if the circumstances that led to the cancellation have been resolved, you can resume the run. The automation picks up from the step where it was stopped.
- Go to MailPoet > Automations and select the automation.
- Open the Analytics tab.
- Click the Subscribers tab.
- Find the subscriber whose canceled run you want to resume. Next to the View activity button, click the three-dot menu (⋮).
- Select Resume run.
- A confirmation dialog appears asking: “Are you sure you want to resume this run?” Click Yes, resume to confirm.

The automation continues from where it left off, and the next scheduled step is executed. A success notification confirms the run was resumed.
Note: The Resume run option only appears for runs with a “cancelled” status. Runs that completed or failed cannot be resumed.
Other Ways to Prevent Automation Emails
For marketing emails in an automation that require a subscriber to be Subscribed to a specific list, removing the subscriber from that list also prevents future emails from being sent to them within that automation. However, non-email steps, such as adding tags or updating custom fields, still execute.
If you need to stop an automation for all subscribers at once rather than individually, see the Deactivating an Automation section above.
You must be logged in to post a comment.