
Note: The CSS examples on this page apply to the Classic style of the Manage Subscription page. If you are using the Modern style, the page has its own built-in design and does not require custom CSS. Switching from Classic to Modern may override any custom CSS you have applied. The PHP filter on this page works with both styles. For more details about page styles, see The Manage Subscription Page.
When your subscribers click the “Manage your subscription” link in their Newsletter, they will be directed to MailPoet’s default Manage Your Subscription Page. If you want to use a custom Subscription page, you can follow these steps below:
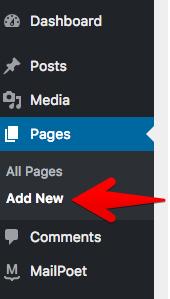
First, you have to create a new page by going to WordPress Dashboard > Pages > Add New:
You can write any message you want and then paste the shortcode [mailpoet_manage_subscription] onto the page:

After you have created and published your new page, access MailPoet > Settings > Basics and go to Manage Subscription page options. Select the custom Manage Subscription page you created from the drop-down menu:

You can click on the Preview link to see what your custom Manage Your Subscription page will look like. Don’t forget to save your settings when you’ve finished editing. You should have a page looking like this:

Add the Manage Subscription block to a page
You add the MailPoet Manage Subscription block to any page to show the manage-subscription form to logged-in subscribers, without the [mailpoet_manage_subscription] shortcode. The block shows each subscriber their own details, subscription status, and list choices.
The block works for visitors who are logged in to your site as a WordPress user and who are also MailPoet subscribers, for example on a WooCommerce My Account page. Visitors who are not logged in see the message “Subscription management form is only available to mailing lists subscribers.”
Note: The block does not use the subscriber details in the “Manage your subscription” link from a newsletter. Keep the shortcode on the page you select in MailPoet → Settings → Basics, so subscribers who are not logged in can open that link.
To add the block to a page, follow these steps:
- Go to Pages in WP Admin, and then edit an existing page or add a new page.
- Click the + block inserter in the top-left corner of the editor.
- Search for “Manage Subscription,” and then select the MailPoet Manage Subscription block.
- Click the Publish button, or the Update button for an existing page.
- Open the published page while logged in as a subscriber. The form shows your own details and list choices.

In the editor, the block shows a sample form with demo details. The published page shows each visitor’s own details.
The block follows the style you select in MailPoet → Settings → Basics, under the Manage Subscription page section. For the differences between the Modern and Classic styles, see The Manage Subscription Page.
Bonus: CSS styling (Classic style only)
The following CSS examples apply only to the Classic style. The Modern style has its own built-in design and does not need custom CSS.
Here are a few CSS styles that would help enhance the look of that page:
form.mailpoet-manage-subscription .mailpoet_text_label,
form.mailpoet-manage-subscription .mailpoet_select_label,
form.mailpoet-manage-subscription .mailpoet_segment_label{
    display: block;
    font-weight:bold;
}
form.mailpoet-manage-subscription .mailpoet_select,
form.mailpoet-manage-subscription .mailpoet_text{
	width: 50%;
	padding: 12px;
}
form.mailpoet-manage-subscription .mailpoet_paragraph{
	margin-bottom:20px
}
form.mailpoet-manage-subscription .mailpoet_submit{
    padding: 20px 20px;
    width: 50%;
    font-weight: bold;
    font-size: 11pt;
}
We recommend you add custom CSS to your website with the plugin Simple Custom CSS.
This is how that page will look on the Twenty Twenty default WordPress theme with the styles above applied:

Advanced: Filter to remove form fields
The mailpoet_manage_subscription_page_form_fields PHP filter works with the Classic and Modern styles, and with both the shortcode and the block. The visual layout differs between styles, but the filter changes the same form fields.
You can use the mailpoet_manage_subscription_page_form_fields PHP filter to remove individual fields from that form.
Here’s an example to remove Custom Fields created during import or form creation (the “Country” field in that image above). Each field id will start with “cf_” (custom field), so the snippet will loop through and unset each field that has “cf_” in the id:
add_filter( 'mailpoet_manage_subscription_page_form_fields', 'mp_remove_manage_fields', 10);
function mp_remove_manage_fields( $form ) {

	// The code below remove Custom Fields
	foreach($form as $key => $value){
		if (strpos( $value['id'], 'cf_') !== false){
			unset($form[$key]);
        	}
	}
	return $form;
}
The fields in the form will have indexes (starting at 0) numbered in the order that they appear on the form. So for example, $form[0] would be the first field (“First Name” by default), and $form[1] would be the second field (“Last Name” by default).
If you wish to remove the First name and Last name fields, you can use this code:
add_filter( 'mailpoet_manage_subscription_page_form_fields', 'mp_remove_manage_fields', 10);
function mp_remove_manage_fields( $form ) {

	unset($form[0]); // First Name
	unset($form[1]); // Last Name

	return $form;
}
Or if you wish to remove the Status dropdown and List Selection checkboxes:
add_filter( 'mailpoet_manage_subscription_page_form_fields', 'mp_remove_manage_fields', 10);
function mp_remove_manage_fields( $form ) {

	unset($form[2]); // Status Dropdown
	unset($form[4]); // List Selection Dropdown

	return $form;
}
We always recommend you add these code snippets to your website using the plugin: Code Snippets.
Assistance with writing/editing custom snippets is outside our scope of support, but if you need help with custom code, we recommend reaching out to someone from Codeable (affiliate link)
Can I Customize the “Need to change your email address?” or “Edit your profile to update your email.” text?
While there’s not a built-in setting to customize the “Need to change your email address? Unsubscribe using the form below, then simply sign up again.” or “Edit your profile to update your email” text, you can use a plugin such as Loco Translate to customize the text. There’s a guide from Woo explaining how to do that here.

Can I Customize the “Edit your profile” link/URL?
Similar to above, while there’s not a built-in setting to customize the Edit profile URL, you can use a PHP filter from core WordPress to change where Edit Profile links point:
function my_custom_edit_profile_url($url, $user_id, $scheme) {
    return "mycustomurl";
}
add_filter('edit_profile_url', 'my_custom_edit_profile_url', 20, 3);
Assistance with writing/editing custom snippets is outside our scope of support, but if you need help with custom code, we recommend reaching out to someone from Codeable (affiliate link)
You must be logged in to post a comment.